> ## Documentation Index
> Fetch the complete documentation index at: https://docs.proxyscrape.com/llms.txt
> Use this file to discover all available pages before exploring further.
# Create a key
> Create your first API key from the dashboard; create additional keys via the dashboard or the API.
You can create API keys from the **dashboard** (required for your first key) or programmatically via the API for additional keys.
## Create via Dashboard
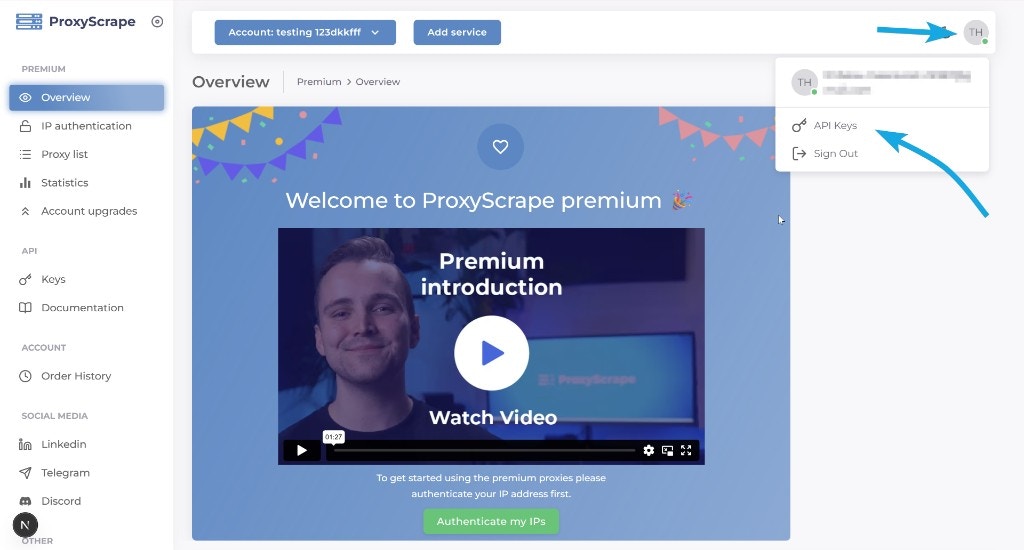
In the [dashboard](https://dashboard.proxyscrape.com/v2/account/api-keys), open the **profile icon** (top right), then select **API Keys** from the dropdown.
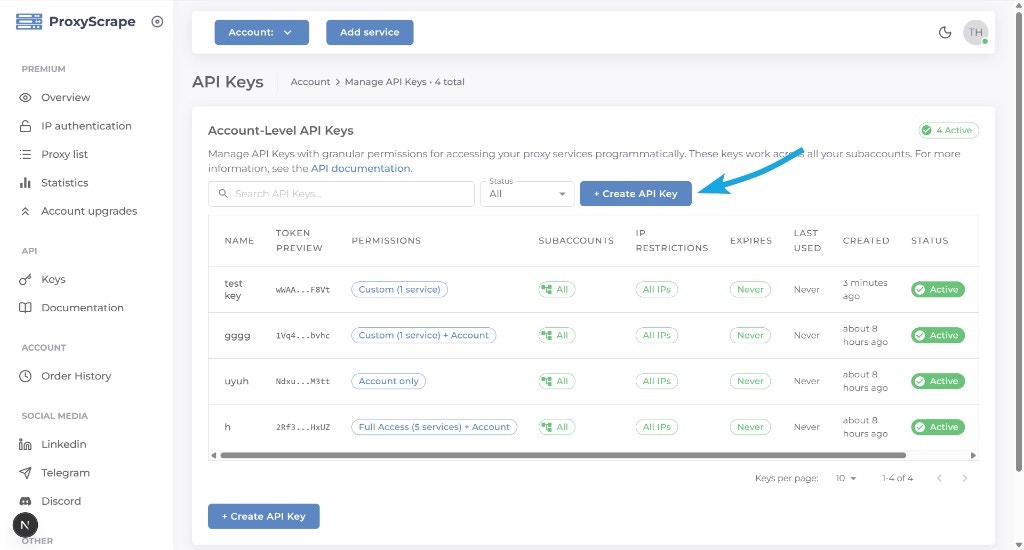
 Click the **+ Create API Key** button to open the creation form.
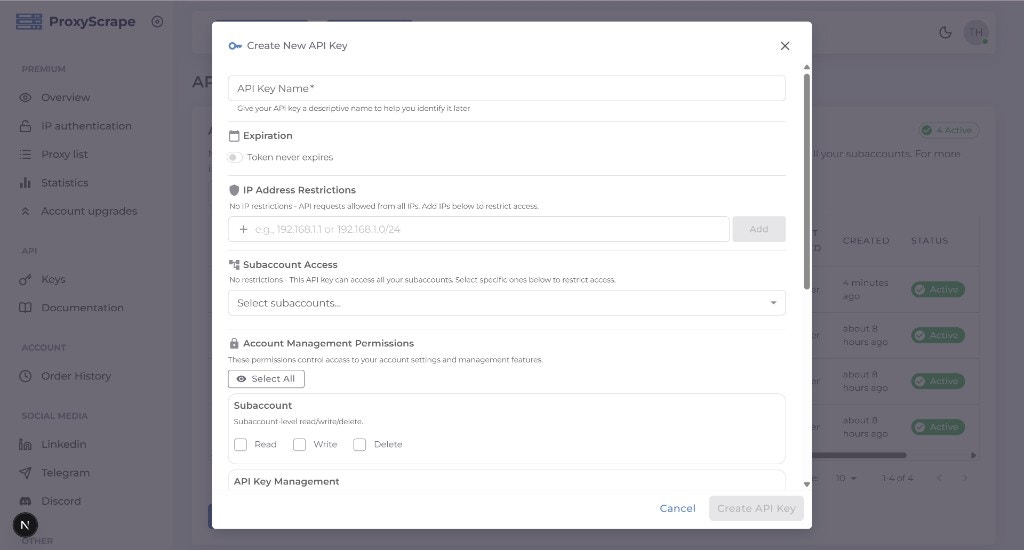
 The creation modal has the following fields:
* **Name** (required) — A label for the key, e.g. "CI pipeline" or "Backend service".
* **Expiration** (optional) — Toggle on and pick a date if you want the key to expire automatically.
* **IP Restrictions** (optional) — Add one or more IP addresses or CIDR ranges. When set, only requests from these IPs can use the key.
* **Subaccount Access** (optional) — Select specific subaccounts the key can access. Leave empty to allow access to all subaccounts.
* **Permissions** (required) — Select which actions the key can perform. Permissions are grouped into **Account Management** (manage API keys themselves) and **Product** (datacenter, residential, etc.). Use the bulk buttons ("Read All", "Write All", "Delete All") to quickly assign permissions across products.
See [Permissions](/api/account/permissions) for details on permission types, the [permission reference](/api/account/permission-reference) for the full list of permissions, and [Scopes and restrictions](/api/account/scopes-restrictions) for more on restrictions.
The creation modal has the following fields:
* **Name** (required) — A label for the key, e.g. "CI pipeline" or "Backend service".
* **Expiration** (optional) — Toggle on and pick a date if you want the key to expire automatically.
* **IP Restrictions** (optional) — Add one or more IP addresses or CIDR ranges. When set, only requests from these IPs can use the key.
* **Subaccount Access** (optional) — Select specific subaccounts the key can access. Leave empty to allow access to all subaccounts.
* **Permissions** (required) — Select which actions the key can perform. Permissions are grouped into **Account Management** (manage API keys themselves) and **Product** (datacenter, residential, etc.). Use the bulk buttons ("Read All", "Write All", "Delete All") to quickly assign permissions across products.
See [Permissions](/api/account/permissions) for details on permission types, the [permission reference](/api/account/permission-reference) for the full list of permissions, and [Scopes and restrictions](/api/account/scopes-restrictions) for more on restrictions.
 After clicking **Create**, the dashboard displays your new API key token. **This is the only time the full token is shown** — copy it and store it securely.
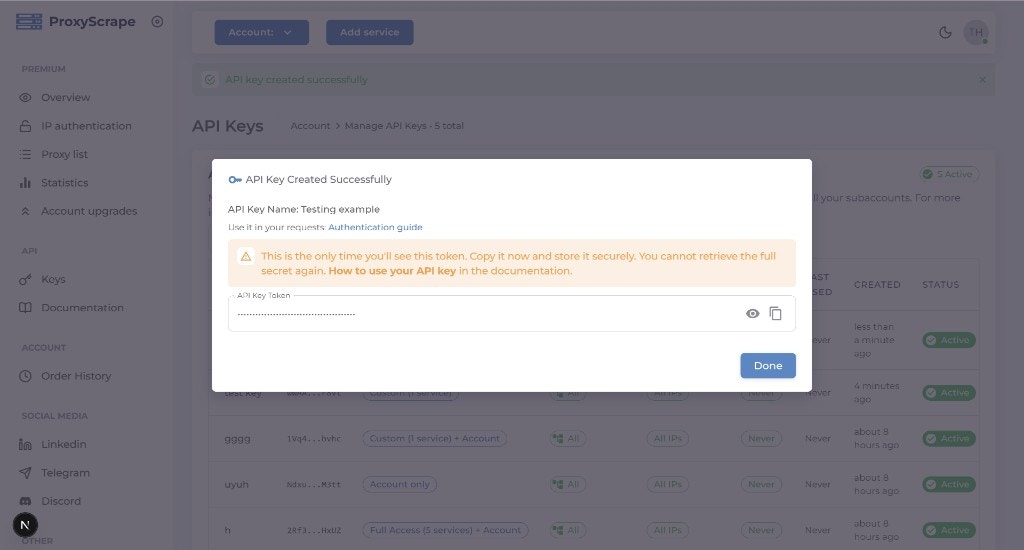 The full token is shown only once at creation. If you lose it, you will need to [regenerate](/api/account/lifecycle) the key to get a new secret.
## Create via API
For automation and scripting, you can create keys programmatically. This requires an existing API key with `account:apikeys:create` permission.
**POST /v4/account/api-keys**
### Request body
| Field | Type | Required | Description |
| --------------------- | -------------------------------- | -------- | ---------------------------------------------------------------------------------------------- |
| `name` | string | Yes | A label for the key (e.g. "CI pipeline", "Backend service"). |
| `permissions` | array of strings | Yes | List of permission identifiers (e.g. `datacenter_shared:read`, `account:apikeys:read`). |
| `allowed_subaccounts` | array of strings | No | Subaccount IDs this key can act on. Empty or omitted = all subaccounts the creator can access. |
| `allowed_ips` | array of strings | No | Allowed client IPs (single IP or CIDR). Omitted = no IP restriction. |
| `expires_at` | integer (Unix timestamp) or null | No | When the key expires. Must be in the future. Omit or `null` for no expiry. |
You can only assign permissions that your own key or session is allowed. Use [GET /v4/account/api-keys/allowed-permissions](/api/account/permissions) to see which permissions you can grant.
### Response
On success, the response includes the new API key object. **The full token (secret) is returned only once** at creation. Store it securely; you cannot retrieve it again. To get a new secret, use the [regenerate](/api/account/lifecycle) endpoint.
## Related
How permissions are formatted and how allowed permissions are determined.
Full list of product and account API key permissions.
The full token is shown only once at creation. If you lose it, you will need to [regenerate](/api/account/lifecycle) the key to get a new secret.
## Create via API
For automation and scripting, you can create keys programmatically. This requires an existing API key with `account:apikeys:create` permission.
**POST /v4/account/api-keys**
### Request body
| Field | Type | Required | Description |
| --------------------- | -------------------------------- | -------- | ---------------------------------------------------------------------------------------------- |
| `name` | string | Yes | A label for the key (e.g. "CI pipeline", "Backend service"). |
| `permissions` | array of strings | Yes | List of permission identifiers (e.g. `datacenter_shared:read`, `account:apikeys:read`). |
| `allowed_subaccounts` | array of strings | No | Subaccount IDs this key can act on. Empty or omitted = all subaccounts the creator can access. |
| `allowed_ips` | array of strings | No | Allowed client IPs (single IP or CIDR). Omitted = no IP restriction. |
| `expires_at` | integer (Unix timestamp) or null | No | When the key expires. Must be in the future. Omit or `null` for no expiry. |
You can only assign permissions that your own key or session is allowed. Use [GET /v4/account/api-keys/allowed-permissions](/api/account/permissions) to see which permissions you can grant.
### Response
On success, the response includes the new API key object. **The full token (secret) is returned only once** at creation. Store it securely; you cannot retrieve it again. To get a new secret, use the [regenerate](/api/account/lifecycle) endpoint.
## Related
How permissions are formatted and how allowed permissions are determined.
Full list of product and account API key permissions.